Note
Currently the only installation method is to use the provided Unity Package VCC Support might come at a later date.
Adding the Unity Package
Drag and drop the Unity Package into your project or select Assets > Import Package > Custom Package and select the NSFW Unity Package.
After importing the package, you should find the files under Shiapra > Bunnia NSFW
Using the Scene file
If you don’t have an existing edit to add the NSFW Addon to, you can use the scene file labeled Shia Bunnia - NSFW under Shiapra > Bunnia NSFW
Adding to an existing avatar
Drag and drop the prefab NSFW Components from Shiapra > Bunnia NSFW onto your avatar.
You should also use the included body material under Shiapra > Bunnia NSFW > Materials as it’s specifically configured for the NSFW version. Then replace the textures with your own custom textures.
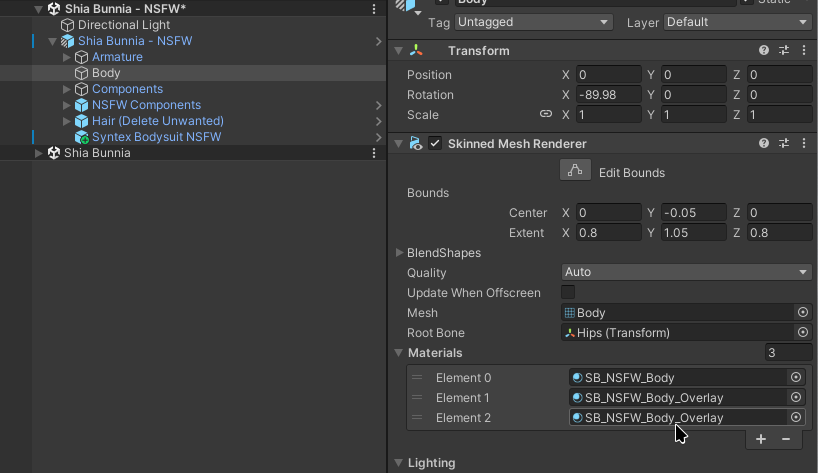
You will also need to add the Overlay material to the body of your avatar for the sweat material & redness overlays to work correctly. If you intend on using the Syntex bodysuit, you will need to add this material twice.
Warning
Do not rename the overlay material, it needs to be named
SB_NSFW_Body_Overlayas it uses poiyomi’s Renamed Animated feature. This means that the animations for the NSFW version, target a material specifically namedSB_NSFW_Body_Overlayand will not work if renamed.
Your body material slots should look like this. You can add material slots by clicking the + under the material slots.
Thicc Water Support
Thicc Water is Optional!
Thicc water is NOT required to set up this avatar! But it is supported with a prefab which will automatically configure things for you, if you wish to use it!
If you are not using Thicc Water, you may get import errors like these. You can ignore this, its just saying it cant find the prefabs its based on. It will not affect the model

If you wish to use Thicc Water with the Bunnia, make sure you have it installed in your project! This will not work without that Installed as it uses prefab variants of the Thicc Water assets.
Use Thicc Water V1.4
The prefab is designed for V1.4 of ThiccWater, please use this version, as V2.0 changes the way ThiccWater works and is incompatible with the pre-made prefab.
You will find a Thicc Water prefab next to the scene file under Shiapra > Bunnia NSFW just drag and drop this prefab onto your avatar in the hierarchy.
Syntex Bodysuits
There are custom Syntex bodysuits for the NSFW version. If you are already using a Syntex Bodysuit from the Extras Repo as part of the VCC integration, you will need to replace the one on your avatar with the NSFW version.
The included Syntex bodysuits are located under Shiapra > Bunnia NSFW > Syntex just drag and drop any of the prefabs onto your avatar in the hierarchy.
Custom Bodysuits
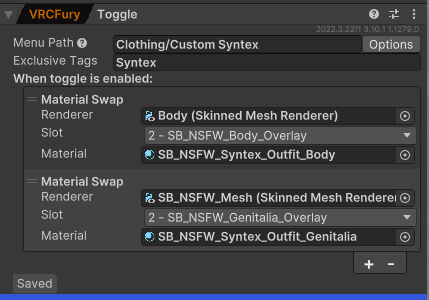
If you are using a custom Syntex bodysuit, you may prefer to make a VRCFury toggle, rather than overwriting one of the materials to the existing bodysuits.
Make sure to configure your material swap to use the third material slot, instead of the second. This is to prevent the sweat and redness material from overlaying on top of the Syntex bodysuit.
Example Custom Toggle
Your custom toggle should look something like this. Note that the material slot says 2. This is because unity counts material slots from 0.
Texturing
Once you’ve got your avatar configured in unity, you’re all set to apply your textures!
You can find the default body materials under Shiapra > Bunnia NSFW > Assets > Materials
By default, two sets of materials are included. One with paws enabled and one with paw/bean textures, and one without.
Enabling the Paws
By default the paws are disabled on the mesh, you will need to enable them with the Blendshapes
Body_Pawpads_Hands&Body_Pawpads_FeetThis is because the textures are not designed to be swapped in game, so there’s not much of a point to make this an in game toggle.

Nipple Textures
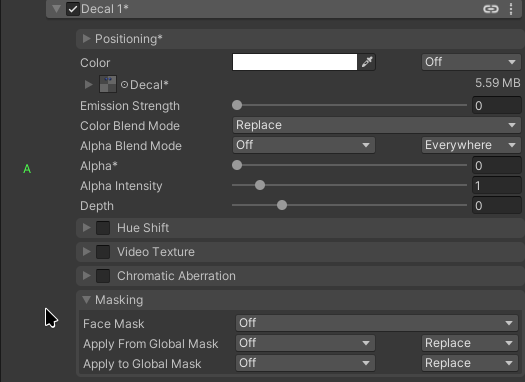
The nipple texture is applied as a decal in slot 1 on the Body material and the Alpha is controlled in game with an animation.
If they are not appearing for you in game, make sure your texture is not 100% transparent and the Decal 1 slot on your Body material is configured as such
Substance Painter
For instructions on texturing and exporting from substance painter, see Substance Guide
Uploading
After you’ve applied your textures, you’re ready to upload! Check out Uploading Your Avatar if you need assistance uploading!